зј–еҶҷAsp.netзҡ„еҗҢеӯҰпјҢз»ҸеёёдјҡйҒҮеҲ°дёҖдёӘRepeater жҲ–иҖ…дёҖдёӘGridView пјҢеҪ“з”ЁжҲ·зӮ№еҮ»зј–иҫ‘зҠ¶жҖҒж—¶жҲ‘们зҡ„еҲ—表组件дјҡиҮӘеҠЁи·іиҪ¬еҲ°еҸҜйҖүжӢ©пјҲеҸҜдҫӣеҲ йҷӨгҖҒзј–иҫ‘гҖҒйҖүжӢ©зӯүпјүзҠ¶жҖҒгҖӮиҝҷж—¶еҖҷдёҖиҲ¬зҡ„еҒҡжі•йғҪдјҡеңЁз»„件зҡ„еүҚж–№иҮӘеҠЁз”ҹжҲҗдёҖзі»еҲ—еӨҚйҖүжЎҶвҖңCheckBoxвҖқпјҢйңҖиҰҒеҲ йҷӨ/йҖүжӢ©е“ӘиЎҢж—¶еҸӘиҰҒеңЁеүҚж–№зҡ„еӨҚйҖүжЎҶеӢҫдёҖдёӢпјҢдҫҝеҸҜд»Ҙеҫ—еҲ°иҜҘиЎҢзҡ„ж•°жҚ®жҲ–иҖ…иЎҢIDзӯүгҖӮ
гҖҖгҖҖдёҠйқўзҡ„еҒҡжі•жҳҜдёҖдёӘжҜ”иҫғе…ёеһӢзҡ„WebеҒҡжі•пјҢйӮЈд№ҲеңЁWP7 йҮҢйқўиҰҒе®һзҺ°иҝҷж ·зҡ„ж•ҲжһңеҰӮдҪ•е®һзҺ°е‘ўпјҹжңүдәӣеҗҢеӯҰе°ұдјҡиҜҙдәҶпјҢйӮЈз®ҖеҚ•дҪҝз”ЁListBox еңЁе®ғзҡ„ж•°жҚ®жЁЎжқҝйҮҢйқўж·»еҠ дёҖдёӘCheckBoxдёҚе°ұе®ҢдәӢдәҶеҗ—пјҹжҳҜзҡ„пјҢиҝҷж ·жҳҜдёҖз§ҚеҒҡжі•пјҢдҪҶеёҰжқҘзҡ„й—®йўҳжҳҜдҪ еҫ—еҺ»жҺ§еҲ¶д»–йҖүдёӯе“ӘиЎҢ并且еҫ—еҲ°е“ӘиЎҢзҡ„IDпјҢ并且еңЁWP7 жңүйҷҗзҡ„еұҸ幕дёӯиҝҷз§ҚеҒҡжі•жҜ”иҫғдёҚеҰҘпјҢеҪ“з”ЁжҲ·жғіеҒҡйҖүжӢ©ж—¶пјҢжҲ‘们жүҚи®©еҜ№еә”зҡ„иЎҢжңүеҸҜдҫӣйҖүжӢ©зҡ„зҠ¶жҖҒжүҚжӣҙдҪігҖӮиҖҢиҝҷз§ҚеҒҡжі•еңЁдј з»ҹзҡ„WP7жҺ§д»¶дёӯпјҢжҳҜжІЎжңүзҡ„гҖӮеӣ дёәжҲ‘们еҝ…йЎ»ж—¶ж—¶еҺ»жҺ§еҲ¶е®ғзҡ„еӨҚйҖүжЎҶжҳҫзӨәжҲ–иҖ…йҡҗи—ҸпјҢдҪҶеңЁиҝҷйҮҢжҲ‘жҺЁиҚҗеӨ§е®¶дёҖдёӘ组件пјҢиҮӘеёҰCheckBOx并且й»ҳи®ӨжңүдёӨз§ҚзҠ¶жҖҒпјҢдёҖз§Қдёәжҷ®йҖҡзҠ¶жҖҒеҚіе‘ҲзҺ°ж•°жҚ®жҳҫзӨәз»ҷз”ЁжҲ·пјҢеҰӮдёӢеӣҫпјҡ

еҸҰеӨ–дёҖз§ҚзҠ¶жҖҒдёәеҸҜйҖүжӢ©зҠ¶жҖҒпјҢеҚіз”ЁжҲ·еҸҜд»ҘеҜ№зӣёеә”зҡ„иЎҢеҒҡеҲ йҷӨзӯүж“ҚдҪңпјҢеҰӮдёӢеӣҫпјҡ

иҜҘ组件зҡ„дёӢиҪҪең°еқҖдёәпјҡWindowsPhoneListBoxWithCheckBoxesControl
дёӢйқўз»ҷеҮәиҜҘ组件зҡ„иҜҰз»Ҷз”Ёжі•пјҡ
еҒҡиҝҮ.Net ејҖеҸ‘зҡ„еҜ№дәҺеҰӮдҪ•дҪҝиҜҘ组件зҡ„еә”иҜҘеҫҲжё…жҘҡпјҢиҝҷйҮҢе°Ҷи·іиҝҮжӯӨжӯҘйӘӨгҖӮ
гҖҖгҖҖеҰӮдёҠеӣҫпјҢиҜҘ组件编еҶҷзҡ„XAMLд»Јз ҒдёәеҰӮдёӢпјҡ
<!--<br />
<br />
Code highlighting produced by Actipro CodeHighlighter (freeware)<br />
http://www.CodeHighlighter.com/<br />
<br />
--><my:ListBoxWithCheckBoxesName="listBoxWithBoxes"Margin="0,0,0,0"ItemsSource="{BindingSimpleModels}">
<ListBox.ItemTemplate>
<DataTemplate>
<StackPanelOrientation="Horizontal"Margin="0,0,0,20">
<RectangleHeight="100"Width="100"Fill="#FFE5001b"Margin="12,0,9,0"/>
<StackPanel>
<TextBlockText="{BindingName}"TextWrapping="Wrap"Style="{StaticResourcePhoneTextLargeStyle}"/>
<TextBlockText="{BindingDescription}"TextWrapping="Wrap"Margin="12,-6,12,0"Style="{StaticResourcePhoneTextSubtleStyle}"/>
</StackPanel>
</StackPanel>
</DataTemplate>
</ListBox.ItemTemplate>
</my:ListBoxWithCheckBoxes>
еҰӮдёҠд»Јз Ғзҡ„ж•°жҚ®жЁЎжқҝпјҢ并жңӘеҮәзҺ°жңүCheckBox жҺ§д»¶пјҢеӣ дёәиҜҘ组件е·ұз»Ҹе°ҶCheckBoxжҺ§д»¶ж•ҙеҗҲеңЁйҮҢйқўзҡ„йҖүжӢ©зҠ¶жҖҒдёӯдәҶгҖӮдёӢйқўжҳҜе…·дҪ“еҰӮдҪ•дёәиҜҘ组件添еҠ ж•°жҚ®гҖӮ
йҰ–е…ҲиҜҘ组件еҜ№еә”зҡ„иЎҢжңүж Үйўҳе’ҢжҸҸиҝ°пјҢиҝҷдёӘеңЁдёҠйқўXAMLд»Јз Ғдёӯзҡ„ж•°жҚ®жЁЎжқҝеҸҜд»ҘзңӢеҫ—еҮәпјҢжҹҘзңӢиҜҘ组件зҡ„ItemSource пјҢдёҖиө·жқҘзңӢзңӢе®ғзҡ„д»Јз ҒжҳҜеҰӮдҪ•зј–еҶҷзҡ„пјҡ
<!--<br />
<br />
Code highlighting produced by Actipro CodeHighlighter (freeware)<br />
http://www.CodeHighlighter.com/<br />
<br />
-->publicclassSimpleModel:INotifyPropertyChanged
{
protectedstringitsName;
protectedstringitsDescription;
publiceventPropertyChangedEventHandlerPropertyChanged;
publicstringName
{
get{returnthis.itsName;}
set{this.itsName=value;NotifyPropertyChanged("Name");}
}
publicstringDescription
{
get{returnthis.itsDescription;}
set{this.itsDescription=value;NotifyPropertyChanged("Description");}
}
protectedvoidNotifyPropertyChanged(stringthePropertyName)
{
if(this.PropertyChanged!=null)
{
this.PropertyChanged(this,newPropertyChangedEventArgs(thePropertyName));
}
}
}
д»Јз ҒжҜ”иҫғз®ҖеҚ•пјҢе°ҒиЈ…дәҶдёӨдёӘеұһжҖ§еҲҶеҲ«дёә他们注еҶҢPropertyChanged дәӢ件е“Қеә”ж•°жҚ®еҸҳеҢ–гҖӮ
иҖҢиҝҷдёӘMODELзҡ„ж•°жҚ®жқҘжәҗдәҺеҰӮдёӢд»Јз Ғпјҡ
<!--<br />
<br />
Code highlighting produced by Actipro CodeHighlighter (freeware)<br />
http://www.CodeHighlighter.com/<br />
<br />
-->publicclassListModel:INotifyPropertyChanged
{
publiceventPropertyChangedEventHandlerPropertyChanged;
publicObservableCollection<SimpleModel>SimpleModels{get;privateset;}
publicboolIsDataLoaded{get;privateset;}
publicListModel()
{
this.SimpleModels=newObservableCollection<SimpleModel>();
}
///<summary>
///еҠ иҪҪж•°жҚ®
///</summary>
publicvoidLoadData()
{
for(inti=1;i<1000;i++)
{
this.SimpleModels.Add(newSimpleModel(){Name="第"+i+"йЎ№",Description="иҝҷжҳҜ第"+i+"йЎ№ж•°жҚ®"});
}
this.IsDataLoaded=true;
}
protectedvoidNotifyPropertyChanged(stringthePropertyName)
{
if(this.PropertyChanged!=null)
{
this.PropertyChanged(this,newPropertyChangedEventArgs(thePropertyName));
}
}
}
д»Јз Ғи·ҹдёҠиҫ№зҡ„д»Јз Ғе·®дёҚеӨҡпјҢиҝҷйҮҢеӨҡдәҶи°ғз”ЁеҠ иҪҪж•°жҚ®зҡ„ж–№жі•LoadDataпјҲпјүдёәдёҠйқўзҡ„жҜҸдёӘModelиөӢеҖјгҖӮиҖҢеҠ иҪҪд»Јз ҒйҰ–е…Ҳдёәе…¶ж·»еҠ дёҖдёӘе…ЁеұҖеұһжҖ§пјҡ
<!--<br />
<br />
Code highlighting produced by Actipro CodeHighlighter (freeware)<br />
http://www.CodeHighlighter.com/<br />
<br />
-->publicstaticListBoxWithCheckBox.ViewModel.ListModelviewModel=null;
//иҺ·еҸ–ж•°жҚ®
publicstaticViewModel.ListModelViewModel
{
get{
if(viewModel==null)
{
viewModel=newViewModel.ListModel();
}
returnviewModel;
}
}
иҪ¬еҲ°MainPageзҡ„code behind д»Јз ҒйҮҢйқўпјҢеңЁжһ„йҖ еҮҪж•°йҮҢйқўдёәDataContext иөӢеҖјпјҢиҝҷйҮҢиөӢеҖјзҡ„иҜқдёҠдёӢж–ҮеҚіеҸҜеҫ—еҲ°ж•°жҚ®жәҗпјҢд»Јз ҒеҰӮдёӢпјҡ
DataContext = App.ViewModel;
еҪ“еә”з”ЁзЁӢеәҸеҜјиҲӘиҝӣжқҘж—¶пјҢи°ғз”ЁеҠ иҪҪе…ЁеұҖеұһжҖ§еҺ»жү§иЎҢжҠ“еҸ–ж•°жҚ®зҡ„ж–№жі•пјҢд»Јз ҒеҰӮдёӢпјҡ
<!--<br />
<br />
Code highlighting produced by Actipro CodeHighlighter (freeware)<br />
http://www.CodeHighlighter.com/<br />
<br />
-->protectedoverridevoidOnNavigatedTo(System.Windows.Navigation.NavigationEventArgse)
{
if(!App.ViewModel.IsDataLoaded)
{
App.ViewModel.LoadData();
}
base.OnNavigatedTo(e);
}
жңҖеҗҺзҡ„иҝҗиЎҢж•ҲжһңпјҢжҲ‘们йҖүжӢ©з¬¬1 гҖҒ2жқЎж•°жҚ®еҒҡдёәж¬ІеҲ йҷӨзҡ„еҜ№иұЎпјҢ然еҗҺеҲ йҷӨзңӢжңүе•ҘеҸҳеҢ–пјҹ
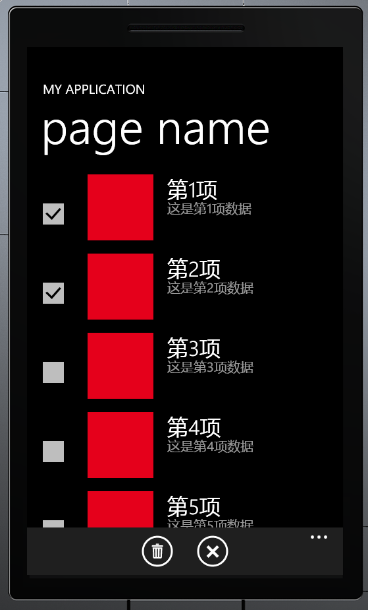
зӮ№еҮ»еҲ йҷӨеҗҺзҡ„ж•Ҳжһңпјҡ

mainPage зҡ„code behind е®Ңж•ҙд»Јз ҒеҰӮдёӢпјҡ

 е®Ңж•ҙд»Јз Ғ
<!--<br />
<br />
Code highlighting produced by Actipro CodeHighlighter (freeware)<br />
http://www.CodeHighlighter.com/<br />
<br />
-->usingSystem;
usingSystem.Collections.Generic;
usingSystem.Linq;
usingSystem.Net;
usingSystem.Windows;
usingSystem.Windows.Controls;
usingSystem.Windows.Documents;
usingSystem.Windows.Input;
usingSystem.Windows.Media;
usingSystem.Windows.Media.Animation;
usingSystem.Windows.Shapes;
usingMicrosoft.Phone.Controls;
usingMicrosoft.Phone.Shell;
usingListBoxWithCheckBox.ViewModel;
namespaceListBoxWithCheckBox
{
publicpartialclassMainPage:PhoneApplicationPage
{
privateApplicationBarapplicationBarChoose;
privateApplicationBarIconButtonapplicationBarIconButtonChoose;
privateApplicationBarapplicationBarDeleteOrCancel;
privateApplicationBarIconButtonapplicationBarIconButtonDelete;
privateApplicationBarIconButtonapplicationBarIconButtonCancel;
//Constructor
publicMainPage()
{
InitializeComponent();
ConstructApplicationBar();
DataContext=App.ViewModel;
this.Loaded+=newRoutedEventHandler(MainPage_Loaded);
}
voidMainPage_Loaded(objectsender,RoutedEventArgse)
{
}
protectedoverridevoidOnNavigatedTo(System.Windows.Navigation.NavigationEventArgse)
{
if(!App.ViewModel.IsDataLoaded)
{
App.ViewModel.LoadData();
}
base.OnNavigatedTo(e);
}
///<summary>
///жһ„е»әеә”з”ЁзЁӢеәҸжқЎ
///</summary>
privatevoidConstructApplicationBar()
{
#region--еә”з”ЁзЁӢеәҸжқЎвҖңйҖүжӢ©вҖқиҸңеҚ•--
this.applicationBarChoose=newApplicationBar();
this.applicationBarIconButtonChoose=newApplicationBarIconButton(newUri("/content/ApplicationBar.Choose.png",UriKind.Relative));
this.applicationBarIconButtonChoose.Text="йҖүжӢ©";
this.applicationBarIconButtonChoose.Click+=newEventHandler(applicationBarIconButtonChoose_Click);
this.applicationBarChoose.Buttons.Add(this.applicationBarIconButtonChoose);
this.applicationBarChoose.IsMenuEnabled=true;
this.applicationBarChoose.IsVisible=true;
this.ApplicationBar=this.applicationBarChoose;
#endregion
this.applicationBarDeleteOrCancel=newApplicationBar();
#region--еҲ йҷӨ--
this.applicationBarIconButtonDelete=newApplicationBarIconButton(newUri("/content/ApplicationBar.Delete.png",UriKind.Relative));
this.applicationBarIconButtonDelete.Text="еҲ йҷӨ";
this.applicationBarIconButtonDelete.Click+=newEventHandler(applicationBarIconButtonDelete_Click);
#endregion
#region--еҸ–ж¶Ҳ--
this.applicationBarIconButtonCancel=newApplicationBarIconButton(newUri("/content/ApplicationBar.Cancel.png",UriKind.Relative));
this.applicationBarIconButtonCancel.Text="еҸ–ж¶Ҳ";
this.applicationBarIconButtonCancel.Click+=newEventHandler(applicationBarIconButtonCancel_Click);
#endregion
this.applicationBarDeleteOrCancel.Buttons.Add(this.applicationBarIconButtonDelete);
this.applicationBarDeleteOrCancel.Buttons.Add(this.applicationBarIconButtonCancel);
this.applicationBarDeleteOrCancel.IsMenuEnabled=true;
this.applicationBarDeleteOrCancel.IsVisible=true;
}
///<summary>
///listBoxдёәеҸҜйҖүжӢ©зҠ¶жҖҒ
///</summary>
privatevoidSwitchToChooseState()
{
this.listBoxWithBoxes.IsInChooseState=true;
this.ApplicationBar=this.applicationBarDeleteOrCancel;
}
///<summary>
///listBoxдёәжҷ®йҖҡзҠ¶жҖҒ
///</summary>
privatevoidSwitchToNormalState()
{
this.listBoxWithBoxes.IsInChooseState=false;
this.ApplicationBar=this.applicationBarChoose;
}
///<summary>
///еҸ–ж¶Ҳж“ҚдҪң
///</summary>
///<paramname="sender"></param>
///<paramname="e"></param>
voidapplicationBarIconButtonCancel_Click(objectsender,EventArgse)
{
SwitchToNormalState();
}
///<summary>
///еҲ йҷӨж“ҚдҪң
///</summary>
///<paramname="sender"></param>
///<paramname="e"></param>
voidapplicationBarIconButtonDelete_Click(objectsender,EventArgse)
{
if(MessageBox.Show("дҪ зЎ®е®ҡиҰҒеҲ йҷӨйҖүдёӯйЎ№еҗ—пјҹ","жҸҗзӨә",MessageBoxButton.OKCancel)==MessageBoxResult.OK)
{
foreach(SimpleModeliteminthis.listBoxWithBoxes.SelectedItems)
{
App.ViewModel.SimpleModels.Remove(item);
}
SwitchToNormalState();
}
}
///<summary>
///йҖүжӢ©ж“ҚдҪң
///</summary>
///<paramname="sender"></param>
///<paramname="e"></param>
voidapplicationBarIconButtonChoose_Click(objectsender,EventArgse)
{
SwitchToChooseState();
}
}
}
иҝҷйҮҢжҺЁиҚҗдёҖдёӘе°ҸжҠҖе·§пјҢеҪ“жҲ‘们编еҶҷеҠЁжҖҒж•°жҚ®ж—¶пјҢеҸҲдёҚжғіиҝҗиЎҢеҚіжғід»Һд»Јз ҒIDEзңӢеҲ°иҝҗиЎҢж•ҲжһңпјҢзұ»дјјдәҺиҝҷж ·пјҡ
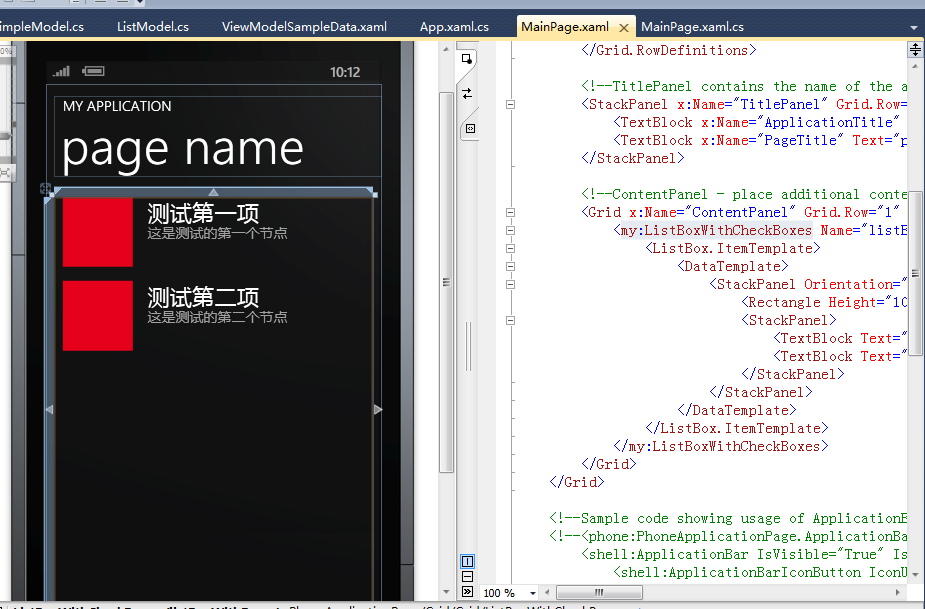
иҝҷдёӘж•ҲжһңиҝҳжҳҜиҰҒеҖҹз”ЁPhoneApplicationPage зҡ„DataContextеұһжҖ§пјҢе…·дҪ“еҰӮдёӢзј–еҶҷд»Јз Ғпјҡ
- зј–еҶҷдёҖдёӘж•°жҚ®xamlе‘ҪеҗҚдёәпјҡViewModelSampleData.xaml ж–Ү件пјҢиҜҘж–Ү件иҙҹиҙЈдёәSimpleModels еҒҡж•°жҚ®пјҢд»Јз ҒеҰӮдёӢпјҡ
<!--<br />
<br />
Code highlighting produced by Actipro CodeHighlighter (freeware)<br />
http://www.CodeHighlighter.com/<br />
<br />
--><viewModels:ListModel
xmlns="http://schemas.microsoft.com/winfx/2006/xaml/presentation"
xmlns:x="http://schemas.microsoft.com/winfx/2006/xaml"
xmlns:viewModels="clr-namespace:ListBoxWithCheckBox.ViewModel">
<viewModels:ListModel.SimpleModels>
<viewModels:SimpleModelName="жөӢиҜ•з¬¬дёҖйЎ№"Description="иҝҷжҳҜжөӢиҜ•зҡ„第дёҖдёӘиҠӮзӮ№"/>
<viewModels:SimpleModelName="жөӢиҜ•з¬¬дәҢйЎ№"Description="иҝҷжҳҜжөӢиҜ•зҡ„第дәҢдёӘиҠӮзӮ№"/>
</viewModels:ListModel.SimpleModels>
</viewModels:ListModel>
- еңЁMainPageж–Ү件зҡ„XAMLз•ҢйқўдёәDataContextиөӢеҖјпјҢд»Јз ҒеҰӮдёӢпјҡ
<!--<br />
<br />
Code highlighting produced by Actipro CodeHighlighter (freeware)<br />
http://www.CodeHighlighter.com/<br />
<br />
-->d:DataContext="{d:DesignDataViewModelSampleData.xaml}"
TipпјҡиҜҘж•ҲжһңеҸӘиҝҗз”ЁдәҺжІЎжңүиҝҗиЎҢеҚіеҸҜжҹҘзңӢж•ҲжһңпјҢиҝҗиЎҢеҗҺе°ҶдјҡеҝҪз•ҘгҖӮ
жҖҺд№Ҳж ·пјҢиҜҘ组件дёҚй”ҷеҗ§пјҢеӨ§е®¶дёӢиҪҪеҗҺиҜ•иҜ•еҗ§гҖӮ
жәҗз ҒдёӢиҪҪпјҡ
ListBoxWithCheckBox Demo
еҲҶдә«еҲ°пјҡ


зӣёе…іжҺЁиҚҗ
WP7 ListBoxдёӢжӢүеҲ·ж–°з»„件йҷ„дёҠжәҗз Ғе’ҢDemo Wp7е…Ҙй—ЁеӯҰд№ Wp7й«ҳзә§ж·ұе…Ҙ Wp8жҺ§д»¶еӯҰд№ Wp7жҺ§д»¶еӯҰд№
winformжҠҠдёҖдёӘlistboxйҮҢйқўзҡ„йЎ№жӢ–еҠЁеҲ°еҸҰдёҖдёӘlistboxдёӯеҺ»
wpfе®һзҺ°жӢ–жӢҪж•Ҳжһңе®һдҫӢ е®һзҺ°д»ҺдёҖдёӘlistboxжӢ–жӢҪдёҖжқЎж•°жҚ®ж”ҫеҲ°еҸҰеӨ–дёҖдёӘlistboxдёӯ
йҖҡиҝҮ继жүҝUserControlжҺ§д»¶пјҢйҮҚж–°еҶҷдәҶдёҖдёӘеҸҜзј–иҫ‘зҡ„ListBox,е®ғеҸҜд»Ҙе®һзҺ°зӣҙжҺҘеңЁжЎҶеҶ…зӮ№еҮ»ж·»еҠ пјҢдҝ®ж”№зӯүгҖӮ
C++ builder xe10ж”№йҖ CheckListBox组件дҪҝе…¶жҳҫзӨәе®Ңж•ҙеҶ…е®№
WPF listBox жјӮдә®зҡ„listBOX
OwnerDrawListBox дёҖдёӘиҮӘз»ҳзҡ„ListBox OwnerDrawListBox дёҖдёӘиҮӘз»ҳзҡ„ListBox
иҝҷжҳҜе…ідәҺlistboxзҡ„дёҖдёӘеә”з”Ёе°ҸжҠҖе·§пјҢйҮҢйқўйҷ„жңүжәҗз ҒзЁӢеәҸгҖӮ
дёҖдёӘеҫҲеҘҪзҡ„listboxе®һдҫӢ
и®ҝQQйӮ®д»¶ж·»еҠ иҒ”зі»дәәеӨҡйҖү组件гҖӮ жң¬ең°еҠ иҪҪjsonж•°жҚ®гҖӮ ж”ҜжҢҒеҗ„жөҸи§ҲеҷЁгҖӮ webkitеҶ…ж ёжөҸи§ҲеҷЁйңҖиҰҒзӣёеҜ№и·Ҝеҫ„и®ҝй—®гҖӮ
дё»иҰҒд»Ӣз»ҚдәҶC#иҜ»еҸ–ж–Үжң¬ж–Ү件еҲ°listbox组件зҡ„ж–№жі•,ж¶үеҸҠC#ж“ҚдҪңж–Үжң¬ж–Ү件еҸҠlistbox组件зҡ„зӣёе…іжҠҖе·§,е…·жңүдёҖе®ҡеҸӮиҖғеҖҹйүҙд»·еҖј,йңҖиҰҒзҡ„жңӢеҸӢеҸҜд»ҘеҸӮиҖғдёӢ
жҖҺж ·еҲӨж–ӯдёҖдёӘеӯ—з¬ҰдёІеңЁдёҖдёӘLISTBOXдёӯжҳҜеҗҰеӯҳеңЁ
дёҖдёӘlistbox ж»ҡеҠЁпјҢеҸҰдёҖдёӘд№ҹж»ҡеҠЁгҖӮдёӨдёӘlistboxеҗҢж—¶ж»ҡеҠЁ
пјҲ1пјүйҖҡиҝҮйј ж ҮеҸҜд»Ҙе°ҶдёҖдёӘListBoxжҺ§д»¶дёӯзҡ„д»»ж„ҸдёҖйЎ№жӢ–еҲ°еҸҰдёҖдёӘListBoxжҺ§д»¶дёӯпјҢеҸҚд№ӢдәҰ然пјӣпјҲ2пјүжӢ–еҠЁж—¶пјҢйј ж Үе‘ҲжүӢеҠҝзҠ¶пјҢд»ҘжӢ–еҠЁж“ҚдҪңжӣҙе…·еҪўиұЎеҢ–гҖӮ
1пјүж·»еҠ дёҖдёӘlistbox control 2пјүи®ҫзҪ®жӯӨжҺ§д»¶еұһжҖ§пјҡHas Strings : true owner draw : fix or variable selection : single е…¶д»–зҡ„еұһжҖ§йҡҸж„ҸгҖӮ 3пјүдёәжӯӨжҺ§д»¶ж·»еҠ еҸҳйҮҸпјҢеҸҳйҮҸзұ»еһӢдёәзұ»CColorListBox 4пјүжҺҘдёӢжқҘз”Ё...
mfc listboxйҖүдёӯеј№еҮәиҸңеҚ•,йҖүдёӯlistboxйҮҢйқўзҡ„дёҖдёӘеҖјпјҢ然еҗҺзӮ№еҮ»еҸій”®пјҢдјҡеј№еҮәдёҖдёӘиҸңеҚ•пјҢйқһеёёз®ҖеҚ•зҡ„ дҫӢеӯҗ
ListBoxйҖҸжҳҺеҲҶдә«word иҝҷдёӘж–ҮжЎЈжңүе®һзҺ°listboxиғҢжҷҜйҖҸжҳҺзҡ„д»Јз Ғж–ҮжЎЈпјҢе…Қиҙ№еҲҶдә«пјҢдёҚиҰҒжөӘиҙ№з§ҜеҲҶ
c# ListboxиҮӘеҠЁж»ҡеҠЁ
C# winform ListBoxзӮ№еҮ»еҲҮжҚўеӣҫзүҮ
дёҖдёӘDelphiж–°жүӢеҶҷзҡ„ListBoxе·ҰеҸідәӨжҚўеҶ…е®№дҫӢеӯҗ..rar`